Tuesday, February 24, 2009

11G : How to create Popup in JDeveloper 11.1.1.0.1 ?

Steps for Create Popup in Jdeveloper 11.1.1.0.1 :


Step-1: Create an Application.

Step-2: Create a JSF page(Ex, neelPage.jspx)

Step-3: Drag the CommandButton ADF faces > Common Component (ex, Edit)UIComponent on the jsp page.

Step-4: Drag & Drop the UIComponent Popup ADF faces > Common Component UIComponent on the Jsp Page, and set id(Ex, editpopid).


Step-5: Drag some UI Componet(or table, form etc) on the popup, within PanelWindow.


Step-6: Drag & Drop the ShowPopupBehavior ADF Faces > Operations UIComponent on the CommandButton(Edit), and set the id the same as popup-in step-4(Ex, editpopid)

Step-7: Run the page.


Download the workspace

Monday, February 23, 2009

11G : How to create Declarative Component ?

Steps for creating Declarative Component in JDeveloper 11.1.1.0.1 ::

Step-1 : Create an Application(Ex, NeelApplication).

Step-2 : Select Project and choose NEW from the Context Menu.

Step-3 : Select JSF from Categories(Web Tier > JSF).

Step-4 : Select JSF Declarative Component than OK.

Step-5 : Put a Name(Ex, Neel_info) for Declarative Component in New windows.

Step-6 : Click on ADD TAG LIBRARY. A new Window will open.

Step-7 : Put the values for Tag_library_Name(ex,Neelmani), URL(ex, /Neelmani), Prefix(Ex, n)

Step-8 : Select + from facet Definitions.

Step-9 : put the value for Name(Ex, your_area).

Step-10: Click OK.

Step-11: Drag some UI component on Neel_info.jspx

Step-12: Go to Project Properties of the Application(select Project Properties from the context menu.))

Step-13: Select Deployment from Left side from the Project properties windows.

Step-14: Click NEW. than select ADF LIBRARY JAR FILE, than put a name. Click OK.

Step-15: Right click on the project than Deploy > Neelmani > to ADF Library JAR (wait for next few second)

Step-16: Copy the Path(where it deployed) from the LOG window.

Step-17: Open the Resource Palate(View > Resource Palate)

Step-18: In Resource palate (New Connection > File System).

Step-19: Put the Connection Name(Ex, Neelmaniconn).

Step-20: In Directory Path, paste the path(which you copied from the log window-in step16).

Step-21: Test Connection. Click OK.

Step-22: Explore the File system(In Resource palate).

Step-23: Right Click on the Jar file(Ex, Neelmani.jar) and Click on ADD TO PROJECT.

Step-24: If any warning cames, click on ADD JAR.

Step-25: Go to Component Palate. Declarative component(Neel_info) has been created under Neelmani(Tag lib).

10G : How to get a comma-separated list of clients by doing a multi-select from an LOV dialog?

Steps to get a comma-separated list of clients by doing a multi-select from an LOV dialog:


Step-1: go to faces-config.xml


Step-2: Search Page: Add search.jspx and create the page where you have an input box and a command button


Step-3: LOV Dialog Page: Add lov.jspx and create a page
a. drag and drop the view from datacontrol palette to add an ADF table .

b. through the table facets->selection of af:table in the structure pane, add the af:tableSelectMany .

c. through the table facets->action of af:table in the structure pane, add a command button for the table .


Step-4: Using the ADF Dialog Framework: Inside the faces-config, add a jsf navigation case from the search page to the dialog, when the action is dialog:lov


Step-5: Inside the search.jspx, add
a. partialTriggers="commandButton1" property for the input text box (InputText1)
b. action="dialog:lov", partialSubmit="true", returnListener="#{backing_search.returned}", useWindow="true" properties for the commandButton (commandButton1)


Step-6: Inside the backing bean search.java, add the following code to enter the returned value into the text box:


action="#{backing_lov.submit_action}"


Step-7: Inside the lov.java (backing bean), enter the following code for the submit_action method

This code will require some missing imports to be added so it works correctly.


Step-8: Inside the lov.jspx, for the commandButton, add the action property

10G : How to deploy the ADF Application ?

Steps for Deployment the ADF Application(seperatly....Model & ViewController) on the server(OAS)::

Step-A: Create DataBase Connection(Optional for test):-

Step-1 : StepPut the CONNECTION_NAME
Step-2 : Put USER NAME & PASSWORD (Of that schema where DataBase exist)
Step-3 : Put Host Name(ex. neel.yahoo.com ), Port(1521), SID(webdb).
Step-4 : Test the Connection OK


Step-B: Create Application server:-

Update the Host_File(RUN- Drivers>etc>Hosts) (Add the IP ADDRESS of the server and address of the server in the last of the file) (ex. 67.170.188.135 neel.yahoo.com neel.eal neel)

Step-5 : Put the connection name(ex, VenusAppSvr)
Step-6 : Put USER NAME & PASSWORD(of the server)
Step-7 : Put Host Name(ex. neel.yahoo.com ), OPMN_Port(5003), oc4j_Instance_Name(ex, Home)
Step-8 : Test the connection OK


ViewController:-

Step-C: WAR file creation :--

Step-9 : Right click on ViewController.
Step-10: Select New from Context Menu.
Step-11: In NEW GALARY select, General>Deployment Profile> WAR File.
Step-12: Give the Name...ex.webAPp1
Step-13: Select Radio Button(Specify Project J2ee web context Root).
Step-14: put...web context root of app(ex, webroot1)
Step-15: Select Prfile Dependencies,
Step-16: Check all the options of ViewController.jpr. OK


Step-D: EAR file creation :--

Step-17: Right click on ViewController.
Step-18: Select New from Context Menu.
Step-19: In NEW GALARY select,
Step-20: General>Deployment Profile> EAR File.
Step-21: Give the Name...ex.Application1
Step-22: Go to Application asembly,
Step-23: check all the conents under ViewController.jpr OK


Step-E: Deploy:-

Step-24: Right Click on the EAR File and Deploy on the Application server.

Tuesday, February 17, 2009

JSF : How to use the Switcher?

Use of the Switcher :

The switcher component dynamically decides which facet component should be rendered. It has two properties. The switcher will render the facet matching "facetName".

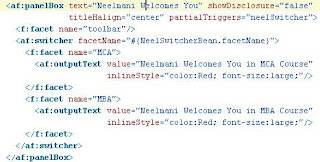
Step-1 : Create JSP page with Dropdown. Use Switcher with Facet.


--


Step-2 : Change autoSubmit and valuePassThrough property as True


Note : Switcher should be in any of the UI Component which have PartialTrigger Attribute.


Step-3 : Write some Code.


JSF : Navigation to another JSF page with Radio Button usage

Navigation to another JSF page with Radio Button usage:

Step-1 : Create the JSP Page with Radio Button.


.
.
.
Step-2 : Write Some Code.
.

11G : How to Create List of Values(LOV) ?

How to Create List of Values(LOV) in Jdeveloper 11.1.1.0.1 ?


Step-1 : Start JDeveloper by selecting Start > All Programs > Oracle WebLogic > JDeveloper Studio 11.1.1.0.0

Step-2 : Create a New Application and Project

Step-3 : Create the Database Connection(Ex, HRConnection for HR-schema)

Step-4 : Create ADF-BC(ex, Entity and View Object for Employee table).

Step-5 : Open Employee(EmployeesView.xml) View Object from Application Navigator.


Step-6 : Select Attribute > DepartmentId.

Step-7 : Goto LIST-OF-VALUES than click on + symbol.

Step-8 : Goto Configuration Tab on the List-of-value windows.

Step-9 : Click + symbol for LIST-DATA-SOURCE.


Step-10: select DepartmentView from Available and Sattle it to Rightside under EmployeeView than click ok.


Step-11: Now select DepartmentId from LIST-ATTRIBUTE dropdown.

Step-12: Goto UI-hint Tab.

Step-13: Select Input-text from List of value from Default list type.

Step-14: Select Department Name from Available and sattle it to Right Side.

Step-15: Check QueryListAutomatically than click OK.

Step-16: Goto ApplicationModule, select RUN from the Context menu, Click to CONNECT in next window.

Step-17: Double Click on EmployeeView1


Step-18: You can see the Browse Button for DepartmentID. Click on that.

Step-19: New Window with LOV will be open.

Wednesday, February 11, 2009

11G : ADF Life Cycle

ADF Lifecycle has Nine phases as follows:


        Fig: ADF Lifecycle

1> Initialize Context: In this phase value of associated request, binding container and lifecycle are set. Binding Container will get Initialized.
                                       
2> Prepare Model: In this phase model is prepared and initialized. In this phase page parameters are set and methods in the executable section of the page definition of the ADF page are executed. Page Parameter, Taskflow parameter & the Iterator which is having PrepareRender as refresh condition will get Initalized.

3> Apply Input Values: This phase handles the request parameters. These may come by adding the request parameters in the URL or as a result of HTML form post action. A list of events is build using these request parameters. These are actually mapped to the bindings in the pageDef. This phase resolves the list of request parameters bind to attributes in the page def. This results into a list of updatedValues which is used in Update Model phase.

4> Validate Input Values: This phase validates the list of values built in the Apply input values field with model.

5> Update Model: After validation of input values data model is updated with the list of values created in apply input values phase.

6> Validate Model Updates: Updates in the previous phase are then validated by calling the associated lifecycle's binding container .

7> Process Component Updates: This phase handles any events in the list built during the apply input values phase. Named events as well as all the events tied to the databindings created in the pagdef are handled in this phase.

8> Metadata Commit: This phase commits the runtime metadata changes to the model. This phase is always executed before prepare render phase.

9> Prepare Render: This is the final phase where page is sent for rendering. prepareRender event is sent to all the registered listeners. This notification signals bindings to prepare or process the data for rendering. Binding container is also refreshed. This helps in updating any changes that happened during validation phases.

11G : Scopes

ADF supports all the usual scope options as in JSF like none, requestScope, session scope and application scope. Along with these scoping options ADF supports one additional highly useful scope option that is, pageFlowScope. Let's talk about these options one by one in brief:
Let's take an usecase to understand it better. Say, there is a a page 'pageA' in your application having a selectOneChoice and a submit button. On clicking the submit button it navigates you to 'pageB'. There is a bean method assoicated with the selectOneChoiceList's value change listener. this method is simply storing the selected value of the list to a bean property.


Fig: Scopes in ADF

1. none: So, with none scope, on changing the the value in the list, the associated bean will be instantiated and the associaed listner method will be called. As soon as the control returns from the bean method the bean will be destroyed. In other words, you cannot access the bean property value after that even on the same page.


2. requestScope: if the bean scope is requestScope then the value stored in the bean property will be accessible even on the pageB. you can simply access it at #{requestScope.yourBean.yourPropertyName}. This bean will be destroyed as soon as you submit another request by say clicking back button to navigate to pageA or by clicking a submit button to do some other action which generates another request to the server.


3. pageFlowScope: This scope is an introduction of ADF. In ADF you can group some pages (called activity) in a logical unit called TaskFlow (more specifically a bounded task flow in this case). Say you have two more pages pageC and pageD and you can navigate from pageA to pageB to pageC to pageD using some next button on each page. Now, suppose you have created a bounded task flow using pageA, pageB and pageC. So, if your bean is of pageFlowScope then after selecting a value in list at pageA if you navigate till pageC, you can still access the bean's property. It persists within the taskflow boundries. But, if you navigate to pageD then the bean will be destriyed. pageFlowScope is kinda more broader than requestScope and smaller than a session scope. For most of the scenarios in ADF you create a bounded task flow to implement a business use case. So, in way pageFlowScope makes more sense than a session scope. Ofcourse, session will be required in cases where you need to persis the values out of a taskflow boundry. You can access it using an EL expression like #{pageFlowScope.YourBean.yourPropertyName}.


4. sessionScope: Continuing with the same example, the bean once instantiated will persist till the entire user session. This session usually persists till a user is logged in. Usually, web servers are configured for a session time out property which makes the session invalid after the specified period of time. So, the bean's property can be access anywhere for that session. Usually, in real life scenarios information related to user like its profile are set in to the sessions.


5. applicationScope: As the name suggests this scope persists as long as the application is running. Ususally, application scope parameters are initialized at the time of application start-up (web server start). Generally, some all time needed resources are initialized using applicationScope which are required all the time and are independent of any specific role or responsibility.

6.View Scope: It Stores objects uaed by a Single Page and retains the objects as long as the user continues to interect with the page, and then automaticaly releases them when the user leaves the page.

7. PageFlow Scope : It makes it easier to pass values from one page to another within a taskflow. This Scopes means that the bean is available for a set of pages in the current taskflow

8. BackingBean Scopes:  It is uased for managed beans for page fragements and declarative components only

Wednesday, February 4, 2009

11G : How to Create ADF Business Component ?

Steps for creation of ADF Business Component(BC) in JDeveloper 11.1.1 ::

Step-1 : Create New Application.


Step-2 : Right click on Model and select NEW from the Context menu.


Step-3 : In categories, select Business Tier > ADF Business Component


Step-4 : Select Business_Component_from_table from Item.


Step-5 : Click OK.


Step-6 : put the package(optional, ex, neelmani.model.entities). (This window is for Entity_Object)


Step-7 : select required Schema(ex, Hr)


Step-8 : Check on auto_query.


Step-9 : select table from AVAILABLE and sattle it to SELECTED.


Step-10: click NEXT.


Step-11: put value for model(optional, ex, neelmani.model.queries). (This window is for Updatable_View_Object)


Step-12: select object from AVAILABLE and sattle it to SELECTED.


Step-13: Click NEXT.


Step-14: Now Select Object from AVAILABLE and sattle it into SELECTED. (This window is for Read_Only_Object)


Step-15: click NEXT.


Step-16: Check Application_Module. put Package(ex, neelmani.model.queries) put Name(Ex, NeelmaniModule)


Step-17: Click Finish.

11G : How to create Application Server Connection ?

Steps for Create New Application Server Connection in Jdeveloper 11.1.1 ::

Step-1 : open Application_Server_Navigator(view > Application_Server_Navigator)

Step-2 : select application_server Node

Step-3 : Right click and select new_Application_server from context menu.


Step-4 : Put the connection name(ex, NeelmaniAS).
Slect Connection_type(ex, WebLogic 10.3)
Click OK.


Step-5 : put userName and Password(weblogic userName and Password). Check Deployed_Password.

Step-6 : put weblogic_host_name(Administrator server, default- Localhost)
put port,SSL_port
put WSL_Domain (Ex, Neelmani_Domain)


Step-7 : Test Connection.


Step-8 : Click OK.

Video for 11G : How to Create Database Connection ?

Steps for Creation of Database Connection in JDeveloper 11.1.1 ::


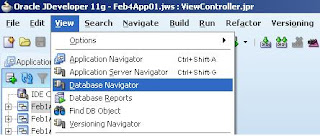
Step-1 : Goto Database Navigator(View > Database Navigator).


Step-2 : select the Application.


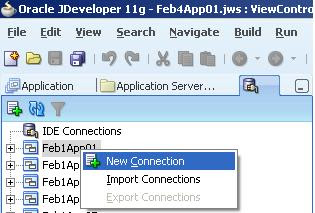
Step-3 : Right Click and select New Connection from Context menu.


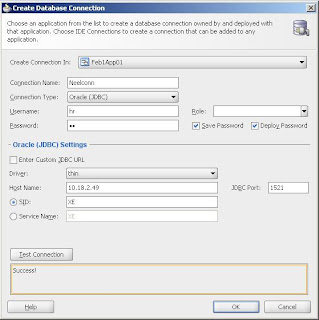
Step-4 : Put the Details:


Put the Connection Name(ex, NeelmaniConn)
select Connection Type(ex, Oracle(JDBC))
put userName(schema_name) and Password(schema_password).
you can leave Role and
check Deploy_password.
put Driver(ex, thin),
put HostName(ex, Localhost)
put Jdbc port(ex, 1521)
put SID name(ex, XE/ORCL)


Step-5 : Click on Test_Connection.


Step-6 : Click OK

~: Video for Database Connection in Jdeveloper 10.1.3 :~

Video for 11G : How to Create an Application ?

How to Create an Application In JDeveloper 11.1.1 ?

Step-1 : Goto FILE > NEW


Step-2 : GotO General > Application


Step-3 : select Required Application type from Item

Step-4 : Click OK


~: Video For Creation of Application in Jdeveloper 11.1.1.0.1 G :~


11G : How to Start Jdeveloper 11.1.1 ?

How to start the JDeveloper 11.1.1?

1> Install Oracle JDeveloper 11g.


2> Start > All Programs > Oracle Fusion Middleware > Jdeveloper Studio 11.1.1


3> Select the Required Role from the Dialog popup(If it ask).


4> Click OK.


5> Jdeveloper is Open Now


11G : How to Upload a File ?

File Uploading in Jdeveloper 11g::

Step-1 : use UI Component(InputFile Component) on the Jsp pages.

Step-2 : Update WEB-INF
Step-3 : update FORM ()


Step-4 : Create Value-Change-Listner & set the value to UiComponent


Step-5 : Bind the value to ManagedBean


Step-6 : Write the code for ManagedBean:


Tuesday, February 3, 2009

10G : How To Create Search and Results on the Same Page

Step-1 : To create a page that has both a search form and results table on the same page, you follow the procedures for when they are on separate pages, except you must create a separate iterator for the results table.

Step-2 : To create a search form and results table on the same page:

Step-3 :From the Data Control Palette, drag a collection and from the context menu, select Forms > ADF Search Form.For example, if you want the query to execute over all service requests, you would drag the ServiceRequests collection.

Step-4 : Drag the same collection, but this time drop it as any type of table.

Step-5 : Open the associated page definition file.

Step-6 : In the Structure Pane, right-click on the Executables node and choose Insert inside
executables > invokeAction.

Step-7 : In the Insert invokeAction dialog, enter an ID for the action, such as AlwaysFind. From the Binds drop-down list, select Find. Do NOT click OK or close the dialog.

Step-8 : In the Insert invokeAction dialog, select the Advanced Properties tab.

Step-9 : For RefreshCondition, enter the following EL expression, which tells the application to invoke this action whenever the page is not in Find mode. Replace with the name of the iterator:${bindings..findMode == false}Note:The invokeAction must appear before the iterator, so that it is executed first.

Step-10 : In the Structure Pane, right-click on the Executables node and choose Insert inside executables > iterator.

Step-11 : Select the same collection used for the search form, and in the Iterator ID field enter a more meaningful name, such as ResultsIterator and click OK.

Step-12 : In the Structure Pane, expand the bindings node, right-click on the binding for the results table, and choose Properties.

Step-13 : In the Table Binding Editor dialog, make sure the correct collection is selected in the Data Collection column.

Step-14 : Select the newly created iterator from the Iterator drop-down list, ensure that all correct attributes are in the Display Attributes column, and click OK.

Step-15 : In the JSF page, delete the Find button.

Step-16 : Doing this only deletes the component from the JSF page। The binding still exists in the page definition file.